Pauline Schloesser, Ph.D., Certified Iyengar Yoga Teacher, IAYT Yoga Therapist
Six Postures to Do at Home this Winter
If you’re a person who skis once or twice a year, there are 3 things you must consider regarding the preparation of your body: strength, endurance, and flexibility.
Failing to consider these things can leave you sore, winded, and likely to choose shopping or the condo couch, so read on!
Even if you have acclimitized to the altitude, you are likely to get winded if you ski continuously down a Rocky Mountain run. You want to be able to get winded and recover quickly, because skiing involves up and down with your hips and knees. If your legs are weak, then you will get winded. As a result, turning, twisting, and transferring your weight becomes difficult. You don’t want to have to take a day off just to rest because of debilitating soreness. And you definitely want to avoid injury and a trip to the ER.
What I’m going to share with you is 6 basic yoga postures that will provide a great foundation for your ski season.
I’m a 58-year-old wife and mother of two teenaged boys. In our family we have finally approached the point at which our kids outski us, but we can still hang with them—except when they want to hit the terrain parks and do the jumps! Over the years, I’ve done nothing but yoga for “exercise” and I’ve noticed that it serves me incredibly well for my yearly ski trip.
My husband is 61 and not at all athletic. So I have to make sure he gets himself ready for the slopes. I’m going to share with you some essential yoga postures that will increase your leg strength, gradually build your endurance, prepare your back muscles and spine, and develop your core strength so you can keep doing your moguls and black diamonds.
Even if you’re not a strong intermediate once-a-year skier, you can only be better prepared for your trip great with these postures.
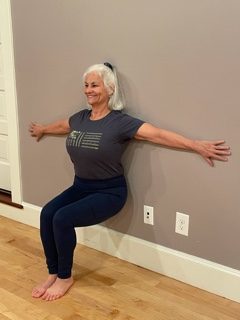
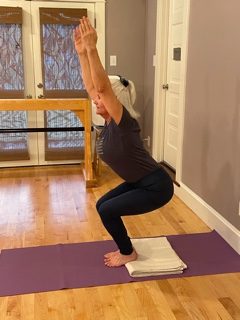
1. Utkatasana (Fierce Posture)
Let’s face it: you have to have strong quads for skiing, because you will be bending at the hips and knees for hours each day.
A) Easy Way: To get started, put your back to the wall and bend 90 degrees at the hips and knees, so your ankles are directly under your knees.
- Keep your knees together if possible, since this works your inner thighs and prepares you for parallel skiing.
- If you can’t keep your legs together, it’s fine keep them parallel and hip-width apart.
- This is the “easy” way because you put your whole back to the wall and spread your arms. Start with 3×10 seconds, or 3×20 seconds, eventually working your way to 3x1minute.
B) Upgrade: Move away from the wall.
- Stand with your arms over your head and squat to get the thighs parallel to the floor.
- Keep the trunk upright. If your ankles are tight and your heels are coming off the floor, put a folded blanket or rolled mat under your heels.
- For extra points, raise the arms up with palms facing each other. This will get your heart pumping and provide cardio conditioning. Start with 3 reps of 10 seconds, then each day see if you can build to 3 x 30 seconds.
- If you have trouble raising the arms, you can keep your hands on your hips, or put your hands on the wall.
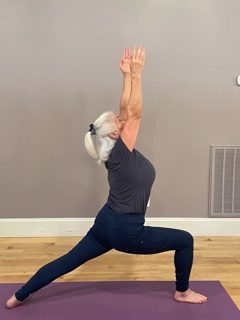
2. Virabhadrasana I (Warrior 1)
This is a posture with one leg in Utkatasana, which you just did, and the other stretching back. Here you combine strengthening of front leg and stretching the back leg and hip.
- As you bend the front leg, make sure to keep the outer knee and outer thigh in line with the outer hip. In other words, keep your front leg shin perpendicular to the floor and do not let the knee roll in.
- Roll the front thigh of the back leg from the outside in so the front thigh is rolling toward the floor. The back foot should be turned outward about 45 degrees. Try to reach the heel down to the floor while at the same time moving that hip forward.
- Then lift the lower abdomen and stretch that front hip.
- To prevent a feeling of compression in your lower back, do not squeeze the buttocks together. Instead, spread the buttock of the back leg out, and move your tailbone in.
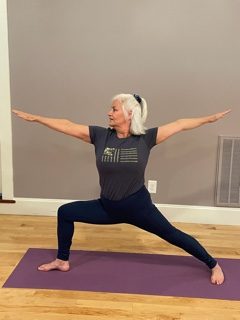
3. Virabhadrasana II (Warrior II)
Now that you know the leg-strengthening benefits of Warrior I, you’ll want to expand on that theme by opening the front of the pelvis laterally.
- Stand with your legs 4 feet apart, with outer edges of the feet parallel.
- Then turn the right leg out 90 degrees. Additionally, align the center of your thigh, knees, and ankle in a straight line.
- Turn the left foot in slightly while pressing the outer edge of the left foot, and then as you bend the right leg to a 90-degree corner. Above all, the knee should be right over the ankle and not come forward of the plane made by the hip and shin bone.
- Work to stretch your inner thighs apart.
- This will strengthen your inner and outer knee ligaments and muscles, so you develop a habit of good knee alignment (no knee injuries!). Do 3 repetitions on each side, staying in the pose 20-30 seconds. Keeping your breathing even without gasping will function as your cardio work. It will also stabilize your mind.
- Another key point: If you cannot make the 90-degree corner bend of the leg, you must prioritize the perpendicularity of the shin. our thigh may not be parallel to the floor, however your knee must be centered over the ankle.

4. Jathara Parivartanasana (Belly Rolling posture)
Yes, twisting is important for core strength and making hundreds of turns in a day. When you make your turns, you want to turn from the hips and lower abdomen and keep your chest facing downhill as much as possible. So, you’ll need to practice Jathara Parivartasana. You’re going to be stabilizing your upper trunk and moving your legs as a unit.
- Lie on your back with arms stretched out to the sides, in line to the shoulders. Keep the palms down on the floor. Bend your knees with the heels close to the buttocks.
- Now, shift your buttocks the left a few inches without moving your chest and arms.
- Then bend your knees to 90 degrees corner. Keeping feet and knees together, raise your legs.
- Press into your arms to keep the upper trunk stable and turn onto your right hip taking your bent legs over to the right, parallel to the floor but not resting on the floor.
- Do not allow your left shoulder blade to come off the floor, even if that means you can’t get your legs over as far to the right. The ankles should be flexed, not limp.
- Keep your knees up near your right elbow for 10-15 seconds; then come back to the center and release the legs down.
- Repeat on the left. Do 3-5 repetitions, resting a few seconds after each cycle. You will be stretching your back and side trunk muscles and strengthening your core.
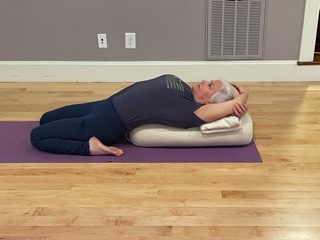
5. Supta Virasana (Reclining Hero)
After all this leg work and hip flexion, you will need to stretch your ankles, thighs, and front hips. The reclining hero is a supported supine posture that will open the frontal groins.
If you’re not a regular yoga practitioner, go get as many pillows as you can find to prop up your back. I am using a bolster for my spine and a blanket for my head. My husband usually needs two bolsters –just saying. You may find that this pose is hard to tolerate—you can’t really relax and yet you need to stay in the pose for some time to reap the benefits.
- Kneel on a mat or carpet, with knees together and just slightly wider than the hips. Find out if you can sit down on the floor between your heels.
- If this is not possible, you may need to put a block or something under your buttocks.
- If your ankles are tight and are lifted off the floor, get a few folded blankets under your sins and ankles so they are supported higher than the ball of the foot. You need to fill the gap under the ankle and give it support.
- Now, for lying back: get your pillows behind you and start to lower yourself onto your forearms. If you can easily lie on your forearms, you may be ready to lie on the pillows or bolster.
- You’re going to feel your front thighs stretch. If they are SCREAMING then you will have to get up and just work on the upright Hero posture.
- While in the pose, try to actively lengthen the front thigh by stretching from the hips to the knee.
- If the back hurts, you must lengthen the fibers of your lower back toward your buttock bones. And do put some lift into the back chest to relieve the lower back.
- Gradually you will be able to stay for 5 minutes. Once you can stay for five minutes, reduce the amount of support under the spine.

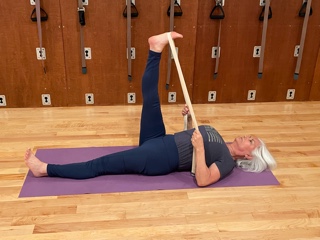

6. Supta Padangusthasana (Reclining Big Toe Posture) I and II
After Supta Virasana, you will need to completely stretch your knees. In Supta Padangusthasana, you will finally stretch your hamstrings and the backs of your knees. Considering that all of the other postures involve knee flexion and hamstring contraction, it’s important to do a straight-legged posture.
Just as we used the Reclining Hero Pose to recover from the strengthening of legs and front hip muscles (illio-psoas), we need opening of the back of the leg to recover from hamstring contraction and knee flexion. In addition, this pose is excellent for stretching buttock and back muscles, so do not omit!
First, get a belt of some sort or even a necktie.
- Lie on your back with legs together.
- Bend your right knee and loop the belt around the arch of your right foot. Hold the belt strands separately in each hand.
- Then straighten your leg to 90 degrees from the floor.
- In order to open the chest at the same time, bend your elbows and push your upper arms into the floor. This is Supta Padangusthasana I.
- If you cannot keep your knee completely straight, you should lower the leg and do less than 90 degrees;
- Alternatively, you can bend the left leg with left foot flat on the floor near the buttock in order to help you get the right leg straight.
- Even if you can’t get your belted leg straight above your hip joint, what’s most important is to keep the knee straight on the belted leg, so that the back of the knee and hamstrings stretch.
- After you have taken the right leg straight up and spent one minute there, you will move to Supta Padangusthasana II.
- Take both ends of the belt in your right hand and keep the tension as you start to open your right leg to the side. This is Supta Padangusthasana II.
- Keep your left hip and leg stable by pressing the left thigh strongly down.
- Make sure your inner right thigh is facing the ceiling while you keep the outer edge of the right foot parallel to the floor.
- Open the back of the knee as you did in the first movement, while also stretching the inner thigh.
So, six poses you can do at home to get ready for the slopes have been provided. These postures will train your legs, knees, hips, abdomen, buttocks, and lower back for fun all day long.
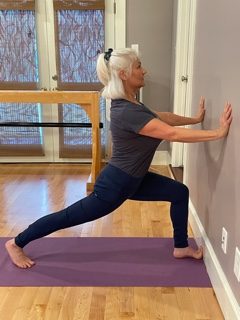
Modifications for women during menstruation: Avoid pressurizing or tensing the abdomen. Do Utkatasana at the wall only with arm support; Do Virabhadrasana 1 and Virabhadrasana II facing the wall with hands on wall. Skip Jathara Parivartanasana altogether during menses. Supta Virasana is fine. Skip Supta Padangusthasana I and do only Supta Padangusthasana II, to avoid putting pressure on the lower abdomen. If you are menstruating during your ski trip, you may want to rest on the heaviest day.
You should start practicing these postures 3-4 weeks in advance of your trip. There are many more postures I could recommend that I do for myself. What I’ve given you is the bare minimum.
Do this sequence 3 times per week, and rest in Savasana, the corpse pose, afterward. Then, when you get to your ski home, make sure to practice in the morning before going out. When you get back, you’ll crave a stretch of the frontal groins and your back will thank you for doing Supta Virasana, the reclining hero. It will help you release the lactic acid in your legs so you will recover faster, sleep better, and be ready for the next day on the slopes!
Feel free to send me your questions and comments.